I decided to write an article about Git and Github. Why? I've been exposed to Git a lot since I started working for a software company. Now, I'm wishing I could go back in time and have used it a lot more... even for projects I had no intention of ever releasing to the public (e.g. most of them!). This article is meant to speak directly to those just like "pre-software company me" -- who might be missing out on the significant advantages of using Git. Ask yourself the following:
- Are you self-taught in most of the programming you know?
- Have you ever made a change to your project and subsequently wished you could undo said change as it created unforeseen bug(s)?
- Have you tried to use git before and been frustrated with some of the very first steps you need to take, such as setting up a new repo from an existing project?
- Do you keep all of your code in a cloud drive like Dropbox or Google Drive to ensure you have consistent code backups?
- Have you ever struggled to work collaboratively with another developer on a project?
- Are you aware of git, and the fact that it is popular and supposedly useful, but been overwhelmed by the initial learning curve?
If you identified with any of the above, this article might help you. If you already know why Git / Github are amazing, you could still benefit from some of the tips below. This article isn't so much a "git 101" as there are lots of great resources out there for that. I may write more on this subject in future though!
Disclaimer
I am not a git master. I am a git neophyte, and that's okay. You don't need mastery to reap the benefits. Since I started working at a software company, I've met some true git wizards, and have benefited greatly from their willingness to impart wisdom.
I'm only just getting started in my Git-learning journey, and I do mean journey -- it's a slough that can honestly be pretty frustrating. (Out of those times of frustration often come some of the biggest Git-epiphanies).
Despite my relative newness, I feel strongly enough about the benefits to write a post because I think there are a lot of folks out there that stand to benefit greatly from beginning to use this technology.
If you disagree with any of the advice I've laid out, think I should add to this article, or just want to chat Git - feel free to drop a comment or connect with me on Twitter/Discord.
Just /some/ of the advantages...
- Redundant, cloud-based backups of JUST YOUR SOURCE CODE. Github now offers private repositories for free. This is SO much better than storing your entire code folder on Dropbox / GDrive / etc.
- The ability to selectively roll-back changes or track specific changes over time.
- Makes collaborative coding much easier if it ends up being a project that involves multiple developers.
- Increases the likelihood of people trying out your product (vs. downloading an installer from a random website authored by someone they don't know or trust)
- If you have future aspirations of working at a software company, particularly in any kind of development role, pre-existing fluency in Git will be a huge asset.
While it does take time to learn, and is a skill that must be maintained, you will benefit greatly as a developer by learning it, and you don't need to be a master to use it right away.
Setup a repo from an already existing project
If you're like me, you may find that you have often already begun writing code before it ever occurred to you to setup a github repo. There are in-built features in Visual Studio, but I've always struggled to make them work with a project that already has code in it. All is not lost.
There's a pretty good write-up here: https://help.github.com/en/github/importing-your-projects-to-github/adding-an-existing-project-to-github-using-the-command-line
But if the inner-millennial in you can't bear to read the above tutorial start-to-finish, please at a minimum keep in mind the following KEY POINT:
When creating your repo on Github, DO NOT create a readme or set a license. You want an entirely empty repo. E.g.
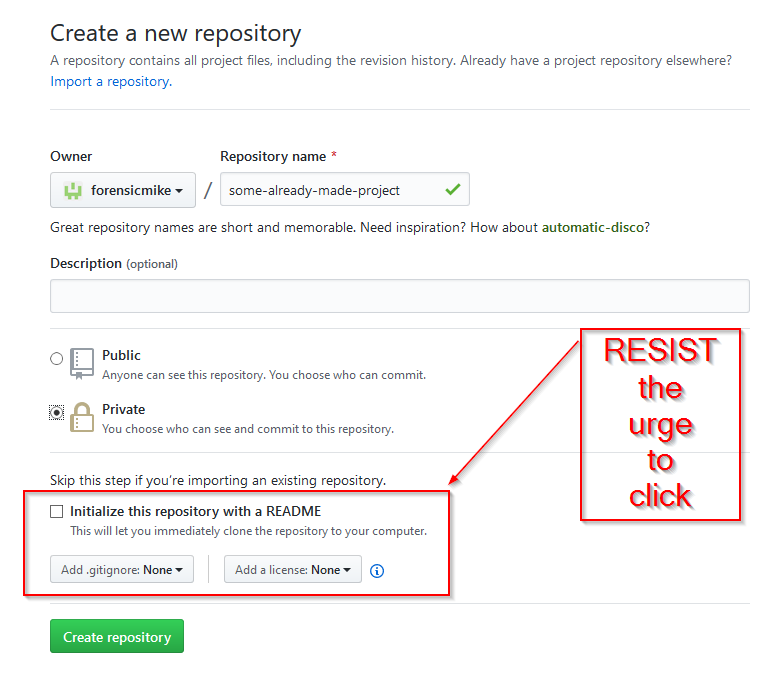
As long as you do that, things will go smoothly in the tutorial. I'd also recommend running a "git status" command before you proceed with your first commit, and ensure you don't see "bin/" or other such folders. If you do, read the next section first.
Before doing your initial commit, create a .gitignore
.gitignore is a file that lists off what should and shouldn't go into your commit. In general, it is considered bad practice to include stuff that gets generated by your compiler in your commits. Another no-no would be including dependencies like NuGet packages as this will massively inflate the size of your repository unnecessarily.
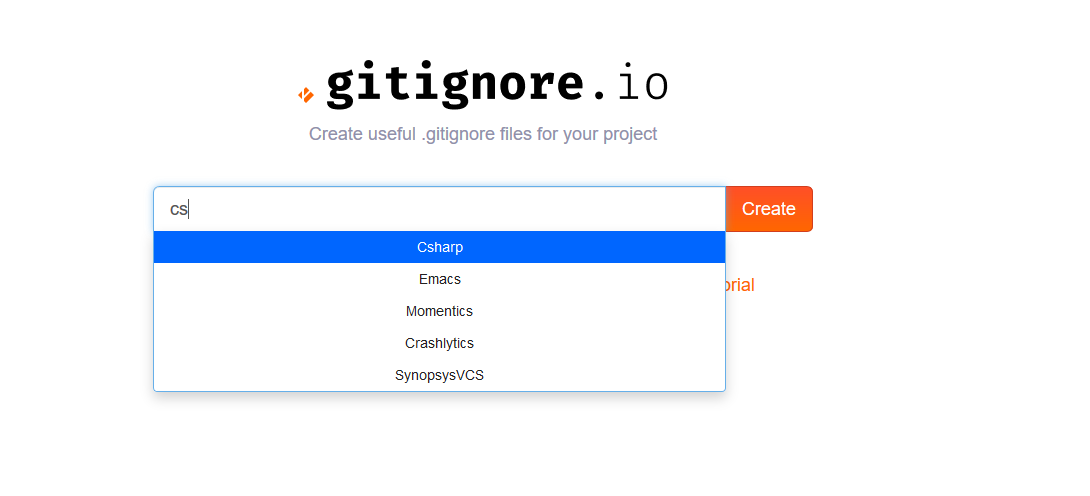
Of course, you are welcome to research what a good .gitignore looks like, but I would personally recommend checking out Gitignore.io . This site provides templates depending on the type of project you're working on. For instance, if you are working on a C# project you can search for CSharp and get yourself a ready to go .gitignore:
You can then save this as .gitignore in the root of your repository and the next time you run "git status" you'll see that folders like:
bin/
obj/
.vs/
packages/
Are all absent from the change list. This means you will only be committing the important stuff to github and any would-be repo cloners will be pleased with you.
Make a nice readme.md
Readme.md is a critical piece of any good git repo. It is one of your only 'sell me' pitches that will help your potential user decide whether or not to going to use this repo. It's a great place to include things like:
- Explain what the product is today and where it came from. Also where you envision it in future. (Current & Future features / roadmap)
- Give direction on how you would like potential issues reported, or whether you are open to others submitting pull requests to your repository.
- Provide links to pre-compiled binaries, if you decide to provide them.
- Shout out any third party libraries you are using in your project.
If your goal is to increase exposure, consider adding one or more screenshots to show off your product.
The "md" in readme.md stands for Markdown. Generous (but not gratuitous) use of markdown-based formatting will add polish to your repo. If you aren't sure how to start with markdown, check out Github's help page on the subject: https://help.github.com/en/github/writing-on-github/basic-writing-and-formatting-syntax
Tip: If you have setup your repo without a read me (such as when you are creating a repo from an existing project) you can add a readme off your main repo page:

Choose the right license
If you're planning to make your repo public at any point, it is important to not only specify a license, but also understand the implications of the license you ultimately select. Github has made this process easier by providing summaries of what each license can do. You might wonder which license is "the best" - and the truth is this really depends on what your project is intended to do.
I'm not an expert in OSS licensing by any stretch, but I definitely see the value in learning the differences between them depending on how widespread of use you anticipate your project seeing.
For example, if you are writing a new filesystem, codec, parser or algorithm which you envision software companies to potentially adopt the use of your code in the future. GPL licenses are designed to force anyone who uses the code to have their code be open source as well.
If on the other hand, you are writing a full fledged app and you'd like to avoid having your stuff plagiarized, GPL might be the perfect solution.
For additional reading on licenses, I recommend the following resources:
- https://choosealicense.com/ (An objective resource from Github themselves)
- https://www.freecodecamp.org/news/how-open-source-licenses-work-and-how-to-add-them-to-your-projects-34310c3cf94/
How to add a license after the repo is already setup
You've setup your repo but now you need to add a license. How do we do this?
From your repository's homepage on Github, click "Create New File". As soon as you type in the word license you will see a button appear called 'Choose a license template' - Click it!

From here, you can select different licenses (the popular ones like Apache, GPL, and MIT are listed at the top) and review their differences. Once ready, click 'Review and submit'.

Finish every coding session with a commit or PR
There are lots of different considerations here, such as whether your repo is public or private, whether you are collaborating with others, etc. The easiest of all is to just commit directly to master, which might be fine if it's a private repo and you're the only one contributing.
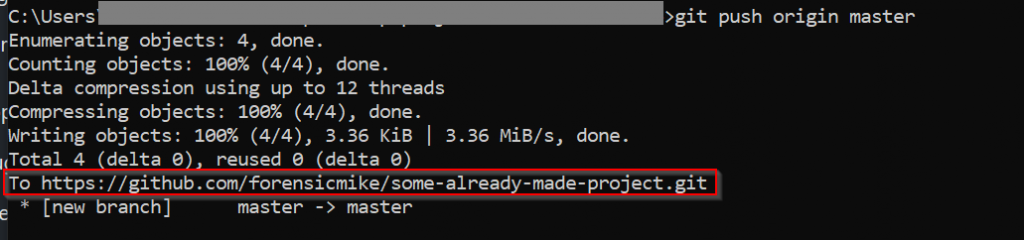
The point is, in order to maximize the 'redundant backup' benefit, you need to make sure that any code you write exists somewhere other than your local machine. Don't make the mistake of thinking that you should wait until you've finished an entire topic worth of code changes to push them. If you've made any code changes at all you wouldn't want to have to re-write, make sure you propagate those changes to Github somehow. Remember: git commit isn't git push. Running "git commit" won't actually backup your changes to Github. Keep an eye on the output of your git commands as it's usually pretty clear when your code has gone out to the internet:
Conclusion
Git has a learning curve, and isn't something you can master in a week. But the sooner you start getting exposed to it the better.